Tutorial Tuesday: Woven Sweater Scarf
Update: I decided that it looked better without the fringe bit in the front so I simply cut it off. I definitely like it more this way, how about you?

Well, I’ve missed the boat on Tutorial Tuesday, but it’s still Tuesday somewhere, right? Right. I started working on this project this evening and probably would’ve squeaked in under the self-imposed deadline, but I ran into a little bump in the road. I had to take several breaks because I think that cutting up wool sweaters might be giving me a wool allergy. When the scissors came into play, my eyes watered, my nose ran, and I started sneezing. So this might be the last recycled wool project, at least for awhile. Enjoy!
Materials:
Cable-knit wool sweater
Scissors
Thread
Sewing machine
Methods:
1. Start with a felted cable-knit sweater. I go over some felting/fulling advice and links in my previous tutorial here.

2. Cut your sweater apart at the side seams and slice it into strips. I let the width of the cables determine the strip size, in this case about 1.5 inches. My sweater had ribbing on the bottom, which I left intact for a finished edge. This would be a good time to iron your strips flat.


3. Create the 4 long strips that will serve as your lengthwise pieces (or warp) for the weaving. I wanted each strip to be about 20 inches long, so I actually stitched together 2 strips for each.


4. Measure the width of the 4 weft strips and cut cable strips in that measurement. In my case that was about 6 inches. Unlike real weaving, I’m not going to use a continuous piece of yarn as the weft, but rather weave a separate piece for each row of the scarf.
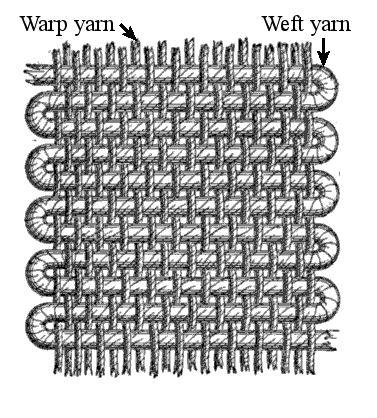
5. Leaving 8 inches free on each end of the long strips, weave the shorter strips and pin the hell out of everything. This diagram from a wikipedia article on weaving might help you visualize the weaving mechanism.


6. Remember how you left about 8 inches on each end of the long strips? After you’re done weaving all of the shorter pieces, take the scarf and fold the ends together. Weave these ends through one another. You’ll probably have to play around a bit with the spacing and number of warp pieces to get everything to fit together correctly. Once you do, pin it all in place.


7. Sew around the outside and inside edges of the scarf.
Results:

Soo tired.

Looking for more tutorials and DIY projects? Check out my What I Made page!


brilliant!!!!
Thank you!
Awesome Rachel! Sui like this..